.png?width=500&height=100&name=500x100px%20Hubspot%20(3).png)
Unboxing
Each device is labelled with its MAC address (numeric and in the form of a scannable QR-code).
Before shipment, all devices are:
-
- Activated.
- Updated to the latest firmware and Box ID specific configuration set up.
- Tested on correct functioning.
- Packed into the required shipment sizes.
That means that all devices are working out of the box.
Mounting
Recommended mounting position on the asset:
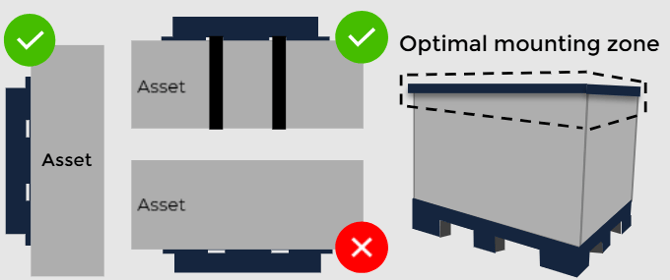
Mounting can be done with screws, bolts, rivets, adhesive, or s zip tie.
Screws 
The device can be mounted on any surface using screws. Recommended dimensions of the screw are 40 x 25 mm. Select screws with a pan head that are suited for the surface that will be used to mount on.
Bolts 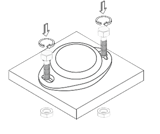
The device can be mounted on any surface using bolts. Recommended dimensions of the bolt are M4 x L. Where L should be chosen based on the thickness of the surface that will be used for mounting. Put a M4 ring between the bolt and the housing. Use a M4 locknut to tighten the bolt.
Rivets
The device can be mounted on metal by using rivets. Recommended size of the rivet is as follows, symbol can be found in the picture.  Rivet size
| dm | No preference |
| P | No preference |
| K | No preference |
| L | Choose based on mounting surface thickness, add 3 mm for the beacon housing. |
| D1 | ≤ 4mm |
| D2 | ≤ 7mm |
The rivet head should be on the device side, the mandrel head should be on the surface side.
Adhesive
The device can be mounted by using industrial adhesive. The adhesive should be suited for installing plastic on the target surface.
Mounting with adhesive is only recommended for smooth surfaces.
Follow the instructions of the adhesive supplier for the mounting process.
Zip Tie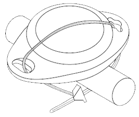
The device can be mounted using a zip tie.
Be aware that zip tying is not always a proper solution to fully secure the position of the device.
This is only recommended for temporary situations or situations where the zip tie can’t be damaged easily.
Installing
After mounting the BOX ID pairing process can begin.
Make sure you have a static gateway mounted and installed.
Read more on setting up assets and pair them with a tag.